

With a 40-hour work week and only a few precious days off, most of my backpacking trips are Friday-Sunday, with many of them being overnights. Over the past couple seasons, I’ve come close to perfecting my stress-free weekend backpacking set up, and I’m here to share it with you.

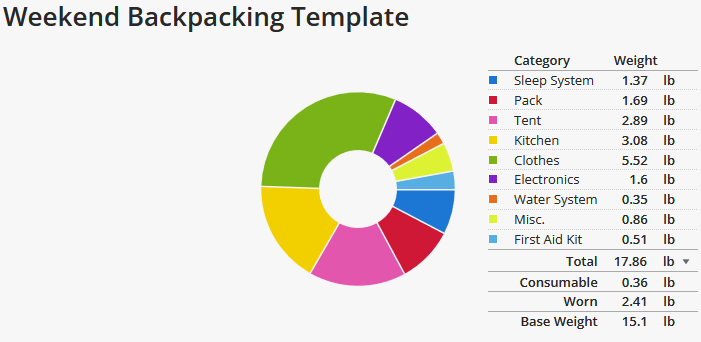
I’d consider my backpacking style “lightweight”, prioritizing gear I already own while slowly upgrading key items over time. If you’re a data nerd or an ultralight addict and haven’t heard of LighterPack, go check it out. We’ll be using an example Weekend Backpacking Template that I made, and break down each section. WordPress won’t let me embed the list, so we will be using screenshots instead.
“The Big Three”
When packing for a trip or purchasing a backpacking set up, prioritize what’s known as “the big three”: your sleep system, pack, and tent. They are the most technical items and often the most expensive to purchase, but also have the largest impact on your overall backpacking experience. If you have limited funds, invest the most into the big three, and make do elsewhere.
There is no best one-size-fits-all backpacking set up and there is a lot of awesome gear out there, some of which might work better for you and your budget. These are the items that I use and love.

I’ve had a Big Agnes sleep system since 2013 and they have given me no reason to look elsewhere. The Insulated Air Core Ultra has been my only sleeping pad for the past 6 years; it’s comfy, packs small, and has proven to be incredibly durable. If you are looking to cut weight and price, closed cell foam pads are a good option (from Nemo or Thermarest), but they are much larger in size. You can test out a huge selection of sleeping pads at REI.
For 3-season use in the mountains, I recommend a 15-20° bag. My current sleeping bag is the Big Agnes Greystone 20°, which has been perfect for a cold sleeper in California mountain summers. In the fall I will pair it with a liner, before I give in and pack my trusted Marmot Ouray 0° bag.
There is no perfect set up and sleep systems are especially personal, find one that works for your body, your budget, and your ultralight goals!

For weekend trips a 35-55L pack would be ideal, depending on the size of your gear. The two key points to look for in a backpack are comfort (always test with a weighted pack!), size, and features (what things do you really need/use on your backpack?). Getting a bigger pack than you need can be enticing, but I would strongly advise against it. If possible, rent or borrow your preferred size pack to test out packing it with your gear.
Some high quality, affordable options are the REI Flash 55, MEC Serratus Pace UL 40L (see my review here), ULA Catalyst 55.

Find one that works for your price range and that is marketed as a backpacking tent. Car camping specific tents can be incredibly heavy, and will likely fail under heavy rain or wind.
I love my Tiger Wall UL 2, but there are a lot of more affordable options that are only a bit bulkier.
Layering
If you hike, run, or exercise outdoors, you probably own all the clothes you need to go backpacking. They may not be the lightest, most pack-able items on the market, but focus on upgrading the “big three” first, before moving on to things in this section. Let’s break down my approach to layering.

Develop a clothing system and stick to it. Keep it simple, know what your staple clothing items are, then have additions on hand when temperatures drop or storms are on the forecast.
For example, I pack the same thing (usually) on every summer backpacking trip, but when fall comes I’ll throw in an extra hiking fleece and swap in my fleece pants. Or, if there is a lot of rain in the forecast, I’ll pack my heavy duty rain shell, rain mitts, and rain pants.
Having a system makes it easy to quickly pack your clothes and reduces the chance that you will forget a key layer.
Here’s how I break it down:
Hiking Clothes: the items getting sweaty everyday, stick to things you know will be durable and comfortable.
- Trail runners (or hiking boots)
- I prefer Altra Lone Peaks
- Good pair of wool socks (read: Darn Tough)
- Shorts (or hiking pants, if you like those)
- I like the classic Patagonia Baggies 5″, comfy & have held up after years of adventuring and everyday wear.
- Sun Hoodie (or any quick-dry shirt/tank)
- My current favorites are from Patagonia and Outdoor Research
- Sun Hat
- I’m always in a Skida Brim Hat
- Quick-Dry Undies

In-Camp/Dry Clothes: the clothes you don’t want to get wet or sweaty, if you can help it.
- Pants – unless it’s looking like an incredibly warm trip, I like to pack a pair of pants to wear at night
- Current lightweight choice is the Patagonia Capilene Mid-weight Baselayer. I don’t love them, but haven’t found anything better.
- For slightly colder trips, I’ve been testing out the OR Ferrosi Transit Pants
- Fleece – lightweight, pack-able, cozy, warm
- I use the classic Melanzana Micro Grid Hoodie, but for warmer trips I’ve been testing out the Leve Alpha Direct 90
- Dry Socks – also known as Sleeping Bag Socks. Make sure they are wool and keep them dry at all costs.
- Again, I recommend Darn Tough.
- In-Camp Shoes – Not every bodies cup of tea, but I prefer to have a dry pair of shoes that I can change into, especially if there is rain or river crossings.
- Crocs don’t absorb water and are lighter than Chacos
Additional Layers: the “maybes”, have on hand and pack as you see fit
- Hiking Fleece: If it will be cold during the day (<45), I’ll pack an extra fleece layer for hiking that I don’t mind getting sweaty or rained on. Currently wearing the Leve Alpha Direct 90.
- Rain Coat – It was drilled into me at a young age that you always need to have a rain coat in so I still almost always carry a rain coat. Even if there isn’t a drop of rain in the forecast, a rain coat over a fleece is a more flexible warm weather alternative to bringing a puffy coat.
- I recently lightened up with the OR Helium Rain Coat – it’s not the most waterproof but does pretty well considering the weight.
- Puffy Coat – If the weather is drops down into the 40s at all, there will be a puffy coat in my bag.
- I prefer a synthetic down jacket that will still provide warmth if it gets rained on or sweaty.
- Warm Hat
- Any old beanie will work great.
- Fleece Pants – for fall backpacking trips, I’ll swap out the baselayer pants for a cozy pair of fleece pants
- REI Fleece Pants are a staple item for me
- Gloves – if temperatures are low, having a pair of gloves can be a game changer
- Wool Liners retain warmth when wet and can easily be layered under warmer mitts
- Waterproof Rain Mitts – recently used these on a cold and rainy trip and I’m a convert.
Note: keeping your hiking and in-camp/dry clothes separate (i.e. being brave and not wearing your warm in-camp fleece while hiking on a chilly morning), is not super important on overnight trips and not bringing duplicates can be a good way to cut down on weight. However, as soon as trips become multi-night OR there is literally any precipitation in the forecast, I highly recommend having a distinct set of hiking clothes + a warm layer that are okay getting wet.
Everything Else

Keep your kitchen simple. A good pot and stove will last a decade, and any old spoon from your kitchen drawer will work great. I often cold soak meals and like to have a “mug” for my coffee, so I carry a Talenti Jar, but you can always just eat out of your pot. GSI and Oli-Camp are great brands for affordable, well-made kitchen wear.
A note on bear canisters: ALWAYS use them when required (and probably where it is suggested). Keep yourself and the bears safe, it’s worth the weight.
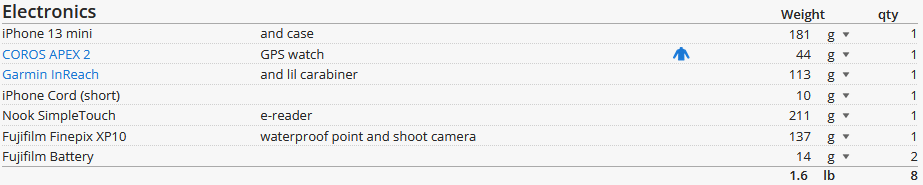
On weekend trips, I don’t typically bring a portable charger. My phone can easily last 3-4 days with the brightness down in airplane mode. I recently purchase a little waterproof point and shoot camera that I use to document my adventures, so that has further reduced my phone battery usage.
I track my hike on a Coros Apex 2 GPS watch, which has incredible battery life (lasted a 4 day, 50 mile backpacking trip on a single charge), so I keep my Garmin inReach is turned off unless I am sending a text message, which I do when I arrive at my camp spot for the night. Occasionally, I’ll bring my trusty old Nook SimpleTouch from 2011, if I think I’ll actually read.

The Sawyer Mini has worked well for me, but the flow rate isn’t anything to write home about. I currently share a filter with my partner, and I’ve found that filters are really a 1 per person item, unless you carry a gravity filter or hand pump. Getting a new water filter is next on my gear list.
For water bottles, use what you have or head to your local grocery store to pick up some smartwater bottles. I’m a recent convert and they are SO much lighter than my trusty old Nalgene. I still prefer to carry a Sawyer water bag to up the flow rate, as compared to just screwing it directly onto a bottle.
This is where things gets personal.
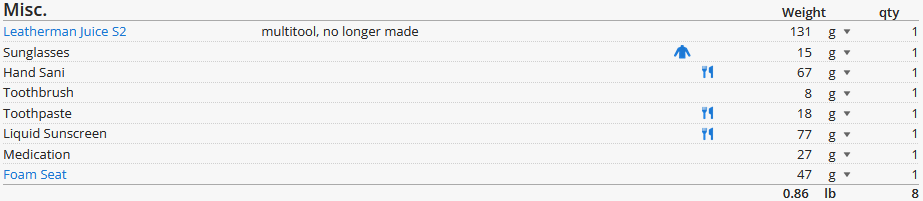
Other than hand sanitizer, toothbrush, and toothpaste, nothing on this list is particularly essential. Bring only what you need. These small items can be easy to forget at home, so I like to keep them all together in a small crate so I can grab them all at once.

My backpacking first aid kit is also my gear repair kit and will be its own post, but for now I’ll leave you with my current default list. On longer trips I’ll add more pills and gauze. Don’t forget to restock when you get home!
Happy hiking!
Disclaimer: Most links are affiliate links, on which I may earn a small commission. Purchasing through them helps to support me and my content! I only recommend products that I have tested, love, and use regularly.
Discover more from Trail Carrot
Subscribe to get the latest posts sent to your email.
